Create a slide to answer the following Essential Questions: 1. Do you consider yourself creative? Why or why not? 2. What is the difference between fine art and craft? 3. How do we communicate thoughts and feelings in the creation of both sculptural and functional forms?
Why Pumpkins
What is the significance of the pumpkins?
In the United States, pumpkins are most recognized for the changing weather as warmer days begin to give way to cool temperatures and darker evenings. They are a fruit that lives in the 'in-between', symbolizing transition and movement towards the darker times.
What is a pinch pot? Simple clay vessels such as bowls and cups of various sizes can be formed and shaped by hand using a methodical pinching process in which the clay walls are thinned by pinching them with thumb and forefinger. ... Thumbs are pushed into the center, and then rudimentary walls are created by pinching and turning the pot.
History of Pinch Pot
Pinch or thumb pots are one of the oldest forms of art, dating back to about 12,000 years. They are as contemporary as they are ancient. When you begin your first piece in this method, as many other ceramic students do around the world, you are participating in an activity that has captivated creators for thousands of years. A well-formed pinch pot has a simplistic beauty all its own, or it can become a base for ceramic forms as complex as you can imagine. Welcome to the world of clay!
Essential questions:
1. How do artists & designers determine goals for designing a sculpture?
2. Why pumpkin?
1. Pumpkins are a member of the gourd family, which includes cucumbers, honeydew melons, cantaloupe, watermelons, and zucchini. These plants are native to Central America and Mexico but now grow on six continents—all but Antarctica.
2. Indigenous North Americans have grown pumpkins for thousands of years—even before the cultivation of beans and corn.
3. In 1584, after French explorer Jacques Cartier explored the St. Lawrence region of North America, he reported finding “gros melons.” The name was translated into English as “pompions,” which has since evolved into the modern “pumpkin.”
4. According to the 2017 U.S. Agriculture Census, Illinois is the largest producer of pumpkins in the United States. It harvests twice as many pumpkin acres as any of the other top-producing states.
5. The heaviest pumpkin was grown in Belgium in 2016 and weighed a whopping 2,624 pounds. The heaviest pumpkin in the U.S. was grown in New Hampshire in 2018 and weighed 2,528 pounds. The largest pumpkin pie ever baked was in Ohio in 2010. It weighed 3,699 pounds and was over 20 feet in diameter.
6. Pumpkin seeds should be planted between the last week of May and the middle of June. They take between 90 and 120 days to grow and are picked in October when they are bright orange in color. Their seeds can be saved to grow new pumpkins the next year.
The rubric of Clay Pumpkin: sculpture:
1. Clay technique: Combines two pinch pots to a pumpkin
2. Have a function: Be creative with form and function to express a Topic/Big idea and Purpose. candle holder, candy holder, planter, teapot, key holder ...
3. Use the ADDITION process to ADD clay to the basic pumpkin form- sculptural elements, handles, insects, leaves, vines nose teeth, animals, etc…
4. Cut out / Carving hollow/ carve out holes / Have a face
5. Use subtraction process- carve out holes, draw on clay, relief carve, carve to shape, add texture
6. Have a great craftsmanship
What is good craftsmanship? Nothing jagged or it will be sharp. Edges are smoothly refined. The form is carefully planned. Walls are even thickness. Joining is secure and hidden. All surface is smooth without careless bumps, dented remarks and scars. The final clay pumpkin sculpture is built with standing balance without wobbles.
1. . Combine two pinch pots
Steps of joining double pinch pots
1. Form a ball of clay
2. Open
3. Pinch in to make the bottom
4. Pinch and Rotate .
Pinch
Pinch more
Until done
Double Pinch Pot Joining Technique
1. Score around the rims of each pinch pot with a knife. You can crisscross the score marks and add slurry or water to help the clay stick.
2. Slip: A mixture of clay and water used to join scored pieces of clay.
Apply slip
3. Place the pinch pots together. This is the most crucial part of the making process! Push one rim into the other by digging your finger in just a little and pushing over to the other side. Repeat all the way round the join. It doesn’t need to look neat!
4. Shaping
Once joined you can gently hit the pot with a stick all over to compress and reinforce the join. Get it into a round shape and knock out the join and pinch marks, patching up any holes using the above technique.
5. Shape the piece to your desired shape. Air hardening clay may not get much taller, but you can use modeling tools to create a smooth surface and define the shape by smoothing up and down.
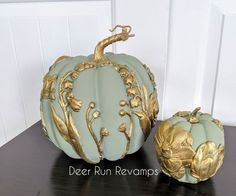
2. Be creative with form and function to express a Topic/Big idea and Purpose: candle holder, candy holder, planter, teapot, key holder, ...
3. Use the addition process to add clay to basic form- sculptural elements, handles, insects, leaves, vines nose teeth, animals etc…
4. Add a lid- a hat, stem -Form a rim/ flange/ irregular edge to secure the lid /cover
4. Cut out / Carving hollow/ carve out holes / Have a face
5. Use subtraction process- carve out holes, draw on clay, relief carve, carve to shape, add texture
6. Have a great craftsmanship
What is good craftsmanship? Nothing jagged or it will be sharp. Edges are smoothly refined. The form is carefully planned. Walls are even thickness. Joining is secure and hidden. All surface is smooth without careless bumps, dented remarks and scars. The final clay pumpkin sculpture is built with standing balance without wobbles.