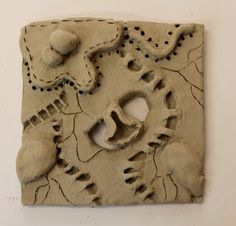
Storyteller Tiles
The craft of ceramics has been practiced throughout history by almost every known culture. Some of the earliest work came from the Middle East and dates back to 5000 BC. Ceramic objects were made most often for functional use—drinking, eating, cooking, or ritual. Ceramics along with other crafts were called the functional arts or applied arts because they “applied” to everyday necessities. However, they were never created to be strictly utilitarian. Hand-crafted ceramics are beautiful and are meant to be admired for their form and decoration and as the individual expression of their creator. Contemporary ceramics has evolved, and often the functional becomes the sculptural and the sculptural becomes the functional. Contemporary ceramic artists have found a balance between form and decoration—one does not exist without the other. Pennsylvania ceramic artist David Stabley not only alters traditional, functional forms, but uses shape, surface, texture, and color to tell stories on clay. Originally trained as a printmaker, David uses the clay surface as his canvas on which he draws, paints, and carves.
Lesson Goals and Objectives:
1. Students learn to make story telling plates or tiles based on David Stabley’s technique.
2. The lesson incorporates art history, aesthetics, and criticism with a hands-on activity.
3. The lesson focuses on various ceramic techniques and important composition and design elements essential to creating a uniquely designed plate or tiles; fundamental technical skills for using specialty finishing products to create non-traditional surfaces; and self-expression.
Homework:
Relief Tile Artists: Visit the following websites and look at the artists relief tiles. Look carefully at how both artists create imagery and develop both high and low relief. Choose one ceramic piece from each of these artists and in 3-4 sentences describe what you think the artist is trying to “tell” about in this piece. Copy and paste an image of each piece to a new page on your portfolio and include your description below the image. Include the name of the artist, title of the piece and any other pertinent information. You should title this assignment “Storyteller Tiles Writing Assignment” in the navigation on your portfolio. Please make sure you PUBLISH this assignment, as I will being grading it directly from your portfolio.
Janice Walrafen: http://www.jravenarttile.com...
David Stabley: stableys.com
PROJECT INTRODUCTION
Tile Options:
Plate – images must extend from outer edge of plate
4 tiles – at least 4x4 (8x8 overall design)
3 tile triptych - horizontal or vertical (at least 4x4 tiles with 4x12 overall design)
ALL TILES MUST RELATE/CONNECT TO ONE ANOTHER
Vocabulary:
Relief: a sculpted image or design whose flat background surface is carved away to a certain depth. Called high or low (bas) depending on the extent of projection of the image from the background
Texture: the perceived surface quality of an artwork.
Imagery: the use of expressive images in art.
Symbolism: the use of recurrent symbols or images in a work to create an added level of meaning.
Triptych: art consisting of a painting or carving on three panels.
Incise: to cut in or into with a sharp instrument; to carve; to engrave
Composition: the placement or arrangement of visual elements in a work of art.
Sketches:
Students should choose a size for their final design (see above), then develop a finished sketch to size of their design on 12x18 drawing paper. Students should find examples of imagery they can use for reference on the Internet or from books. The finished design should tell a personal story about a dream, a memorable event, or an important person. It should include small, medium, and large images, as well as a foreground, middleground and background. Please choose a theme that is important to you so that you will be inspired to put a lot of effort into this project.
Process:
1.) Transfer your design to the clay tiles using the method demonstrated in class.
2.) Begin adding clay to build the higher relief areas of your design.
3.) Once you have added all the high relief areas and your clay is leather hard, begin using the available tools to carve lines, textures and details into the clay.
Use a rigid, dry paint brush to remove the excess clay as you carve.
4.) Smooth the edges and backs of the tiles using a sponge when you are finished carving.
5.) You may lightly smooth your carved areas as well.
6.) Your tiles should dry between pieces of drywall to ensure that they dry flat. Allow them to dry slowly to avoid cracking.
Finish:
You will use black or dark acrylic paint to paint your tiles, then apply various colors of Rub’n Buff to each area of your design to add color.
Individual tiles will be mounted on wood or a clay backing.
Assessment:
Both your sketches and final design will be graded on the following:
-Choice of theme
-Choice of imagery/symbols
-Use of small, medium, and large images
-Development of foreground, middleground, and background
-Composition
Execution of relief – development of both high and low relief
Addition of texture
Tiles are of equal size and remained flat after drying and firing
Tiles are unified/related
Appropriate color choices
Display choices
Craftsmanship


